How to make video lectures for YouTube
School teachers as well as students make video lectures for YouTube all the time and either share with their friends and students or publish on YouTube. Not too long ago, people used only texts and images to make lecture notes. Not that these practices are gone, but slowly, thanks to the internet, tutors globally have discovered that with easy-to-use software such as Bandicam, they can make video lectures for free and distribute them online.
To study from a book, students need to focus on the texts they see on the paper and keep their eyes tracking the seemingly unending lines and blocks of texts. With a video lecture, however, you can do other things while still learning from it. You also get to speed up or slow down the play speed, rewind the lecture, and pause it, etc. and learn at your own pace.
This is why more people are starting to prefer watching video lectures over reading books because videos are faster to assimilate and watching them does not require as much time as reading pages of text. As a matter of fact, on search engine result pages, some people prefer solutions on YouTube to those on blogs. Video lectures have so many benefits over the regular books or even audio, and there are not many simple guides on how to make your lectures. Therefore, this short post will guide you on how to make video tutorials and share them to YouTube and other platforms fast and easy.
Steps for making video lectures for YouTube
Do you always watch YouTube video lectures and have something you wish to teach also? It may seem like a daunting task but all it takes is the first video. With a computer and screencast program, you can make video lectures quickly.
My preferred screencast program for creating video lectures is Bandicam. It simplifies the process and allows you to integrate helpful additions such as your face and voice recording to the video lecture. A smartphone can handle the voice recording part easily – simply connect it to your computer, and you’re good to go.
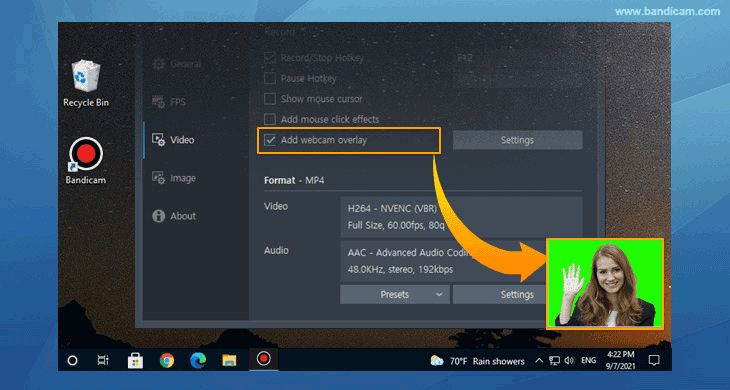
If you want to add an overlay of your face to a corner of the video lecture, then you will need a webcam. Now, with most other screen recording software, you would record the screencast and then do the facecam separately. It’s stressful and produces out-of-sync videos. However, in Bandicam, you get to record your screen display, audio, and the video from your webcam all simultaneously.
Follow the steps below carefully to learn how to make video lectures.
Whether you are a novice at it or been doing it for years, you will find Bandicam helpful.
-
Step 1: Download Bandicam and install the program.
Download Bandicam from the following link: https://www.bandicam.com/downloads and install the program. The installation is quite straightforward, and you will mostly be clicking “Next” with no complex steps.
-
Step 2: launch it on the computer
After downloading the screencast program, Bandicam, launch it on the computer on which you want to make the video lecture.
-
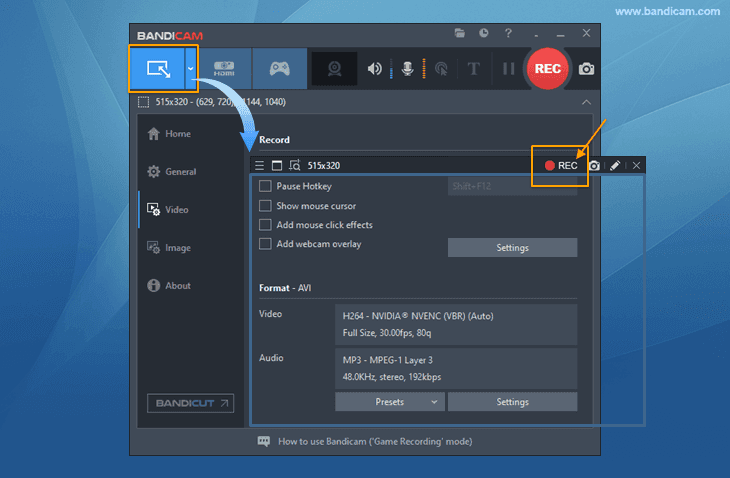
Step 3: Select a screen recording mode
After launching the application, select a screen recording mode. Bandicam is a multifunctional screen recorder, and so it has modes for different recording scenarios.

-
Step 4: Finish the screencast recording
On choosing the recording mode and getting your resources for the lecture ready, hit the [ REC ] button to commence the recording. This is the same button you will click to end the video. Don't worry, when you click it to begin recording, it changes to the [ STOP ] button.
How to upload the video to YouTube from Bandicam
After ending the video, go to Home > Video to view all your videos. Click on the recording you just made and select an option from the bottom menu. The operations Bandicam lets you carry out on the video are play, edit, delete, or upload. To share the lecture to YouTube, hit “Upload.”
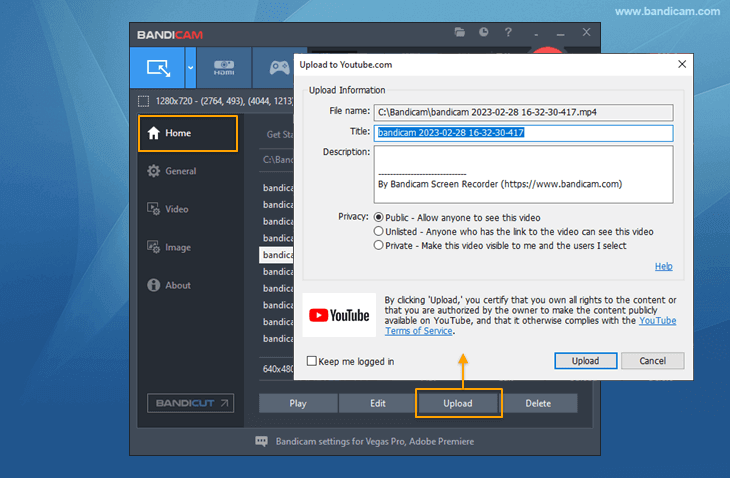
When you click the “Upload” button, you will then have to enter the email address and password of the Google account you use for YouTube. Type the credentials in the appropriate field and hit “Allow” to authorize Bandicam to access your Google account and upload the video lecture.
Immediately you grant the permissions to Bandicam by hitting the "Allow" button, the upload begins. The time it takes depends on your internet speed and the length of the lecture. On completion of the video upload, you will get a popup window saying “The video upload is complete!” YouTube also creates links to the video as well as a code for embedding it.
![Bandicam, Click the [Copy] button to share your video](png/youtube-upload-6.png)
Bandicam receives the shared links and pastes them in the following popup window. To share this YouTube video with other websites, social media, or as a text, all you have to do is click the "Copy" button beside the link. Alternatively, if you wish to watch the uploaded video, hit the "Go" button.
Conclusion
The concept of learning with YouTube video lectures is not new, and so there is no better time to get in on the action. Teachers can reach thousands of students online, form partnerships, and grow their brands and authority on YouTube with video tutorials.
If you go into posting lectures for YouTube wanting to begin with sophisticated and expensive tools, you may get overwhelmed and leave. This post recommends that you use Bandicam because it has all the essential functions of the expensive, professional software and somehow still makes the process easy even for noobs. Record the video lecture with voice and facecam, add markings, edit it, and also upload to YouTube, all on the same application, Bandicam. Get started recording your YouTube lectures the easy way using this guide.
Last Updated on
