Try Bandicam Screen Recorder!
Download Bandicam (Free)How to make a screencast on Windows
They say experience is the best teacher; a screencast is a perfect way to share your experience with others, so they learn from it the easy way. With the rise in popularity of YouTube, TikTok, Udemy, and other platforms that rely on video, everyone is making videos these days. And why not? It's easy to make with the right set of tools.
A screencast differs slightly from fun videos like TikTok or strictly academic videos on Udemy and YouTube; screencasts aim to teach or demonstrate something. This blog post will guide you through the process of making a screencast on Windows. It's easier than you think, I promise.
Before we delve into the tutorial, let’s first talk about screencasts next.
What are screencasts?
A screencast, AKA screen recording or screen capture, is a video recorded from the display of your screen that usually has the author narrating what happens on the screen. Like a video screenshot, screencasts are great for demonstrating processes, capturing errors, or sharing knowledge and ideas leisurely or professionally. The popularity of screencasts has increased because of their usefulness and the fact that it’s quite easy to create one.
To make a screencast, all you need are the following:
- 1. Screen recording software.
- 2. Recording materials (PowerPoint, etc.)
- 3. A microphone.
- 4. Optionally, a webcam.
Screencasts are incredibly important, and they are loved by both the teachers and students. With these video recordings, students can listen to lessons over and over, with the ability to pause, rewind, or fast-forward, etc. Also, teachers would no longer need to repeat the same lessons a hundred times daily, thanks to professional screencasts.
Steps for making a screencast quickly
Please follow the steps below to record PowerPoint videos for lecture purposes.
-
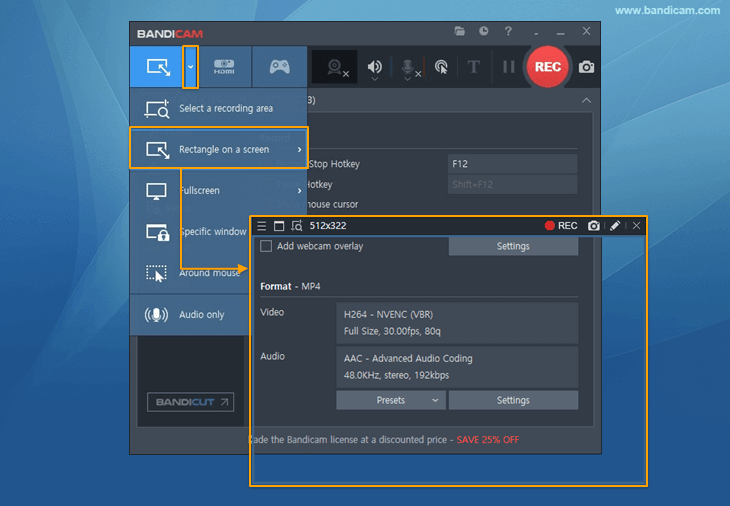
Step 1: Select a screen recorder
To make the screencast, you need a capable screen recording tool. For this, there are tons available, so some of the features you should look out for include:
![Bandicam, rectangle screen recording]()
- A recorder that lets you use different capturing modes depending on the nature of the screencast to be recorded.
- One that features inbuilt video editing functions.
- Easy to share recordings online with one click.
- It must have real-time markup and cursor features, such as mouse cursor display, mouse click effects, and mouse highlight effects.
- Check the recording quality and FPS (frames per second) rating.
For great screencasts, get Bandicam. It is a screen recorder for all situations. Whether you are a teacher looking to make lessons or entire courses, YouTuber, gamer, app tester, etc., Bandicam is fun to use and ticks all the boxes.
It has different screen recording modes, one-click sharing, picture-in-picture recording of your display and webcam input simultaneously, and most importantly, high recording quality. -
Step 2: Prepare to record the screencast
With Bandicam installed on your computer, you are ready to begin. You may want to prepare a script and rehearse the steps you will take on the screencast. Now is the time to do that.
The preparation also involves getting ready your lecture materials like PowerPoint slides and PDFs ready. If you want to capture your face and overlay it on a corner of the screen, then set up your webcam.
![How to record Powerpoint presentation, How to record PPT]()
-
Step 3: Capture your screen with Bandicam
- Launch Bandicam to begin recording the screencast.
- If you want to record computer sound and your voice, select "(Default Output Device)" for the Speakers and "Your microphone device" for the Microphone. » How to record microphone sound
- If you want to add a webcam to the video, check the "Add webcam overlay to video" and "Preview webcam on-screen" checkboxes. » How to add a webcam
- To enable useful features such as mouse cursor display, mouse click effects, and mouse highlight effects, etc., navigate to the “Mouse” tab. » How to add mouse effects
- With the PowerPoint, PDF, or lecture area displayed on the screen, set the area you want to record and how you wish to capture it. Do this by clicking on the icon on the top left side of the menu. Select an option from the dropdown revealed, and then click the '● REC' button or press the hotkey (F12) to start/stop the recording.


Step 4: Use a real-time drawing tool
Bandicam is feature-rich that comes with all of the above settings for effects that you can use while recording the screencast. You also have a pen tool, highlighter, you can add texts, arrows, and every tool you need for a wonderful screencast. » Real-time drawing
-
Step 5: Finish the screencast recording
When you are done with the recording, hit the STOP button on the Bandicam window to end it. Your video will now be saved to a designated folder. From the list here, you can double-click it to watch the screencast, delete it, or even edit it with Bandicut. If you are okay with the screencast, Bandicam lets you upload it to YouTube or Vimeo in one click. Alternatively, you could copy it to an external media to view or share with another system.
![Bandicam, rectangle screen recording]()


Conclusion
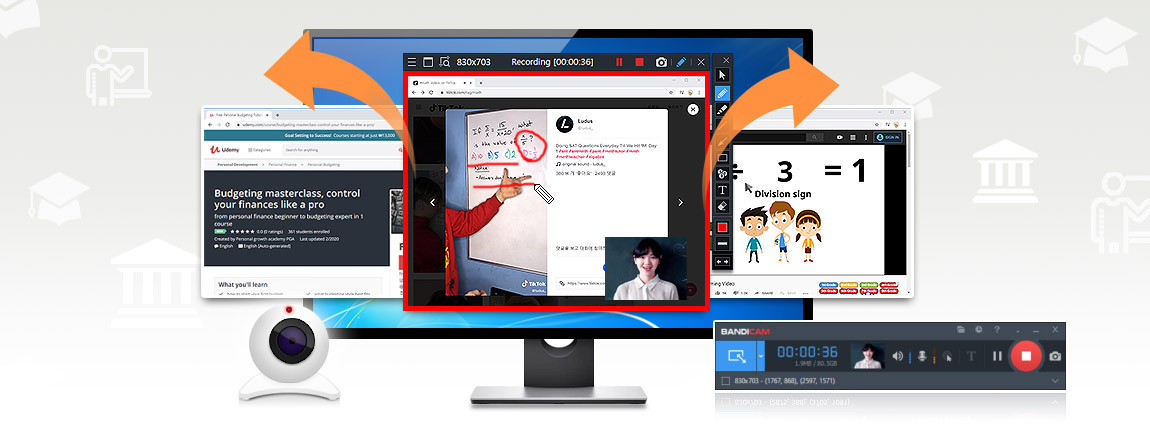
A screencast is a narrated video recording of your computer screen. Students can watch a teacher's screencast video in a class or their home. With Bandicam, you can record lectures, tutorials, and share your screencast video to YouTube.
Last Updated on
