In gaming, “clips” usually refers to short video recordings or moments captured in the game using built-in or external recording tools. These clips are often shared through social platforms and discussed within the gaming community to celebrate achievements, discuss strategies, or review gameplay experiences.
This article will introduce three methods to clip videos or capture clips on a PC using free tools.
- Method 1. How to clip the last 30 seconds on a PC (Xbox Game Bar)
- Method 2. How to clip on PC with Nvidia Shadowplay
- Method 3. How to record clips on a PC
The table below compares the quality and features of each method’s screen recording tool.
| Xbox Game Bar | Nvidia Shadowplay | Bandicam | |
| Video Quality * | Normal | Best | Best |
| Video Size ** | Normal (69.6 MB) | High (166 MB) | Best (36.5 MB) |
| Record last minute | O | O | X |
| Select the recording area | X | X | O |
| Capture desktop full-screen | X | O | O |
** File size when recording 1 minute of the game at 30 FPS
How to clip the last 30 seconds on a PC
Xbox Game Bar is a feature introduced by Microsoft for Windows 10/11 designed specifically for gamers. It allows you to record a specific application, such as a game window or browser. If you press the Windows key + G while an application is running, the Xbox Game Bar will appear as an overlay at the top of your computer screen, allowing you to record the running application.
You can also record the last gameplay moments by pressing the Windows key + Alt + G. This recording feature helps keep track of the last few moments of gameplay and clip the last several minutes. Here is a step-by-step tutorial to clip on a PC using Xbox Game Bar:
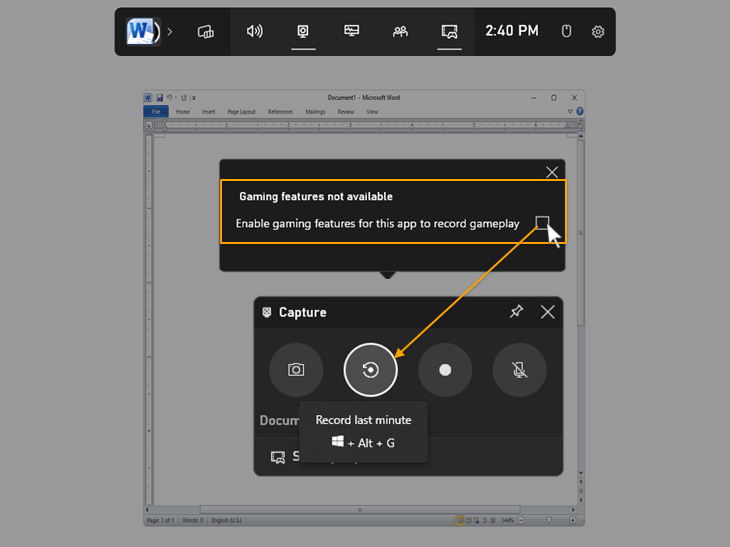
Step 1. Start a game or application you want to clip and press the Windows key + Alt + G.
Step 2. If it’s your first time capturing the game, a pop-up message will appear to enable the gaming feature.
If you use the “Enable gaming feature” option, you can clip your game by pressing the shortcut keys (Windows key + Alt + G).
However, the Xbox Game Bar does not support capturing the entire Windows desktop screen or selecting a recording area. Also, it can’t be used on PCs that don’t meet the hardware requirements.
If you want to capture your full computer screen or some specific area, we recommend using a third-party screen recording tool such as Bandicam.
How to clip on PC with Nvidia Shadowplay
NVIDIA ShadowPlay is a software offered by Nvidia GeForce graphics cards and provides features such as gameplay recording, instant replay, and desktop capture. To use the NVIDIA ShadowPlay feature, launch the GeForce Experience app by pressing Alt + Z.
With its recording feature, you can record games supported by GeForce Experience. You can find the list of supported games via this link: GeForce-supported games. When recording a game supported by GeForce Experience, only the game window will be recorded.
If the game is not on the list of supported games, you can capture your gameplay using the “Desktop capture” option. To use Desktop capture in GeForce Experience, press Alt + Z, go to the settings, and enable “Desktop capture” under the Privacy control.
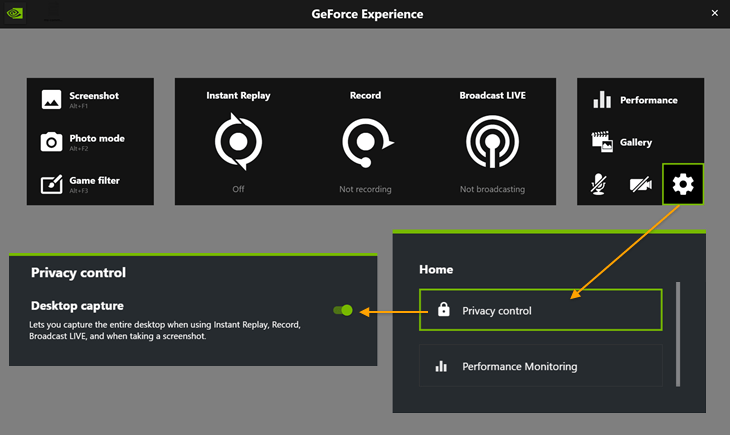
However, this Desktop capture feature records the entire computer screen and doesn’t allow you to select a specific recording area, such as a game window. Additionally, GeForce Experience recordings take up more disk space than Xbox Game Bar and Bandicam, given the larger video size when recorded under the same recording conditions.
How to record clips on a PC
If you want to record clips without lag on your Windows PC, Bandicam is the best screen recording tool for Windows. You can record a particular area or the entire desktop screen with Bandicam Screen Recorder.
In addition, Bandicam can record with a high compression rate while maintaining the quality of the original video, so you can get the best quality even if the video size is small.
Follow the steps below to capture a clip on a PC using Bandicam:
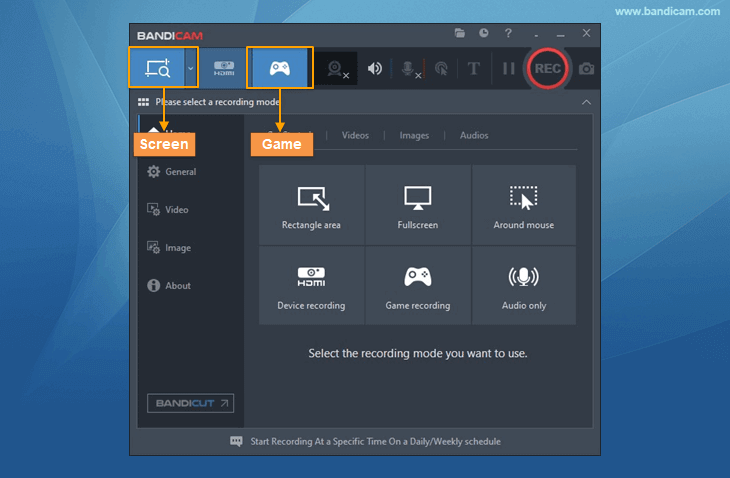
Step 1. Download Bandicam, and select Screen recording or Game recording mode depending on your preferences.
- Screen recording mode: You can select a specific area to capture
- Game recording mode: You can capture only the game window
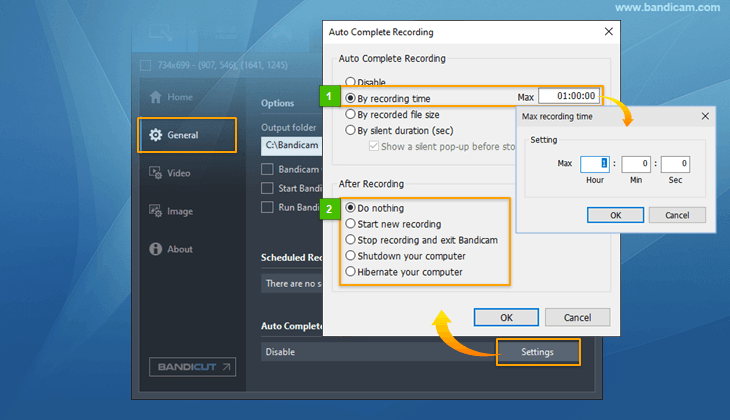
Step 2. Set the auto stop recording feature if you want to record for a few seconds or minutes.
Step 3. Once you’ve modified the settings, click the ● REC button to start recording.
Step 4. Press the ■ Stop button to finish recording and check your recorded clips.
You can play, edit, or upload the clips directly to YouTube, Google Drive, and Vimeo.
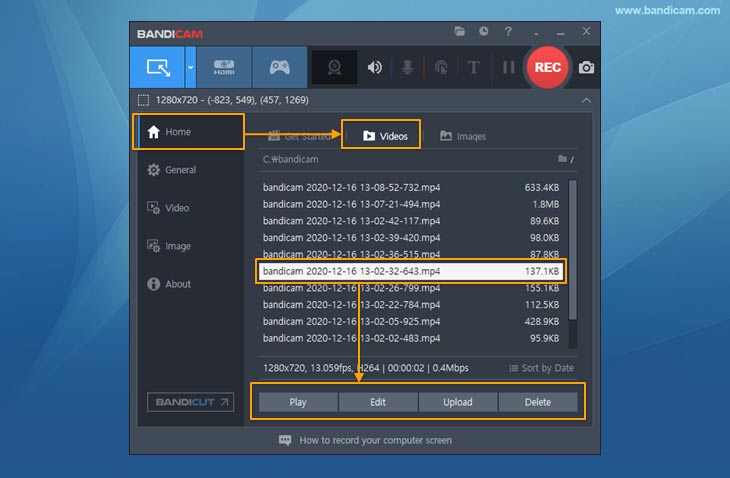
Additional Tip: Clip a specific part of a longer video
If you want to share a specific part of a longer video, you can cut your video clip using Bandicut Video Cutter.
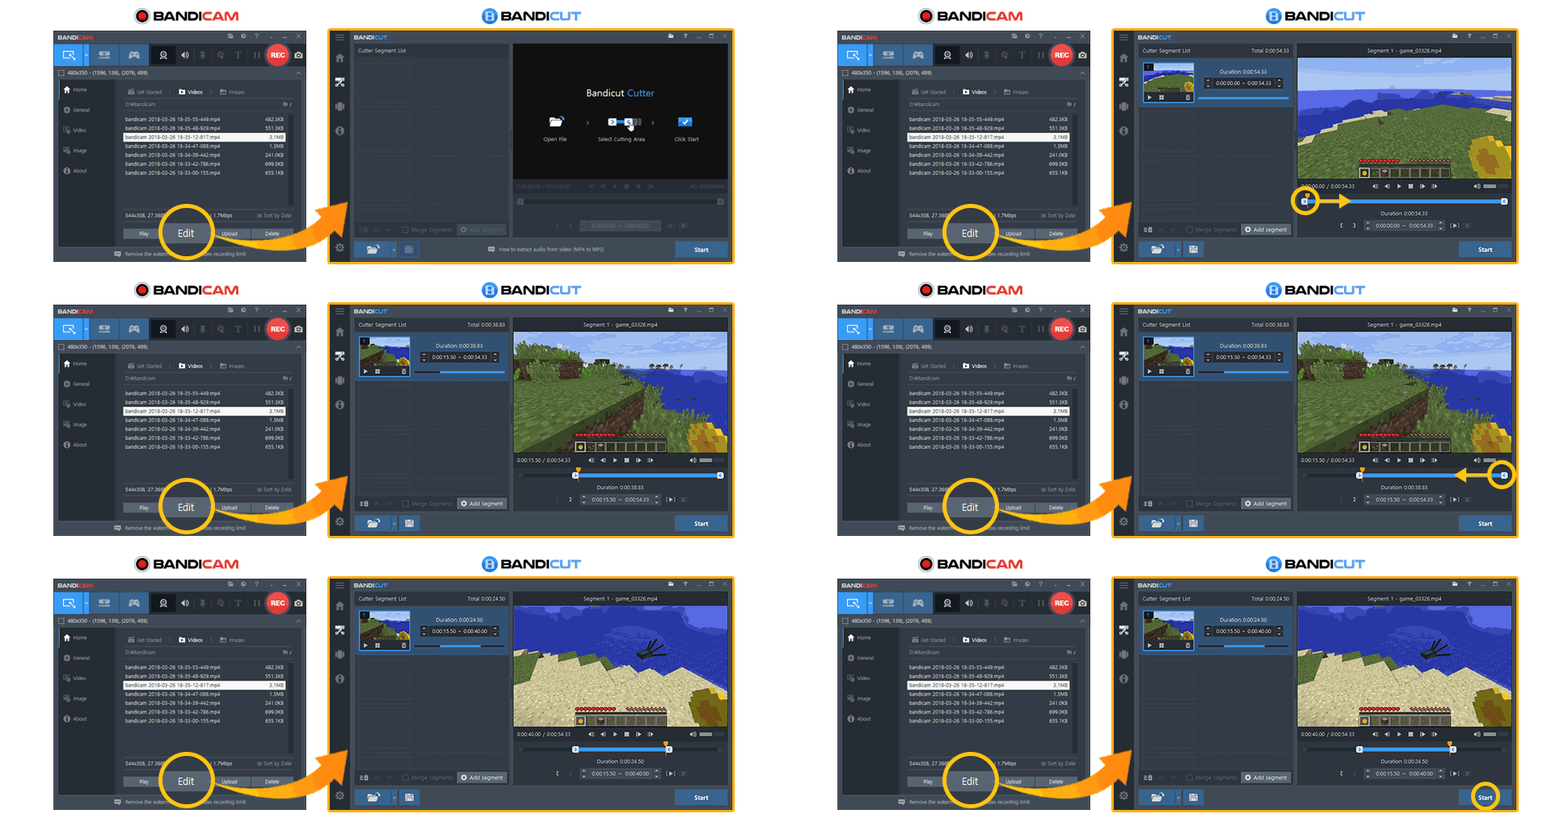
Step 1. Select a video and click the “Edit” button in Bandicam.
Step 2. Bandicut will pop up with the selected video. Set the beginning and end points of the portion you want to save, and click on the ‘Start’ button.
Summary
Capture key moments and highlights from a game or match by clipping videos on PC with three tools introduced in this article: Windows Xbox Game Bar, Nvidia’s Instant Replay, and Bandicam.
For effortless clip recording with the option to select the desired recording area, Bandicam is the best tool for you. Capture a specific area or the entire desktop screen with Bandicam and save the clips seamlessly.
